DIY LEGO Shirts

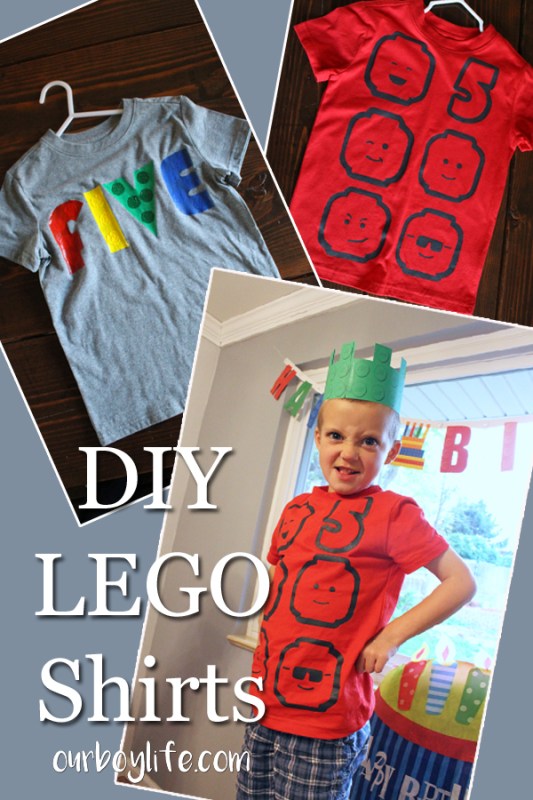
Making birthday shirts for our youngest has become a tradition in recent years, so this year some DIY LEGO shirts were in order. Since he was having more than one party, just one shirt wouldn’t do! Here’s how the shirts came together.
Supplies for Painting DIY LEGO Shirts
- Fabric paint (you can use puffy paint, but I found actual fabric paint works best)
- Paint brushes (including a round paint sponge for this project)
- Blank t-shirt (or two)
- Freezer Paper
- Shirt design (create or find your design and print it on regular printer paper)
- An iron
- A cutting mat or piece of cardboard that will fit inside the shirt
Painting Steps
The first steps in this process are the most tedious.
- Grab your design. I created this design by spelling out the word ‘five’ in a heavy font.
- Take your printed design and place it behind your freezer paper. You want the shiny side of the freezer paper to be facing down and the printed designing facing up.
- TIP: cut your freezer paper to be slightly smaller than your piece of paper with the printed design. Tape the freezer paper to the printed design.

- Cut out your design. You want to remove all pieces that will be painted on the shirt, so that you are left with a stencil.
- Set your iron to a low setting. Place your freezer paper stencil on the shirt and gently iron it in place. The freezer paper will stick to the shirt. Be sure to get all corners and edges ironed down.
- Now you can start painting!

- Darker colors work better on darker fabric and fabric paint works much better than puffy paint. See how nicely the green covers compared to the other colors. That was fabric paint while the other letters were puffy paint.
- Paint until you have the coverage you need. Just remember that the thicker the paint, the more difficult it may be to remove the stencil.
- Once the paint is dry, you can gently remove the stencil.
- TIP: use an craft knife to help release the paint from the stencil if it’s sticking. Just be careful not to cut your shirt!

I created the little circles using a round paint sponge, and then added puffy paint to create the dimension of LEGO bumps.

Here’s the finished product!
Second DIY LEGO Shirt

The second shirt was created using the same process. I found LEGO heads online, printed them and cut them out. The cutting was more detailed on this one, but the painting was much easier.

Sometimes simpler is better. I think this one was the favorite.

Let us know if you make your own DIY LEGO Shirts. Just tag us on social media or send us an email. We’d love to see them!
